You have to start wiht printing/drawing this on some paperboard (you can also make a 1st version on normal paper, just to adjust its shape for your camera):
Next, you need to cut it out, and run down on the lines with sharp edge of scissors, so you can fold it without any problem. After that, you must apply a layer of glue and lay a tinfoil on it (it's for better reflecting of light, so brushed side goes on the glue).
Wait until glue is dry, fold it by the lines, and wrap it around with duct tape.
Lines on the picture that makes something like \__/ (on the upper part) are a part of 'exit' for light. Next step is to take a pice of white paper and stick it (you can see that on the lower picture).
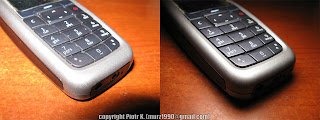
I modified this diffuser a little to make it fit for my camera and that is last and the bestversion (sorry for quality etc, but it was taken with my mobile phone):
As you can see, I cut out a hole for my flash. You must make few versions to make it the best for your camera, the most important is where you have your flash. The white paper ath the end should be pointed at place in front of lens, where will be object that you want to photograph.
And now a little comparision. On the left without, on the right with diffuser. You can see difference ;)
Smaragdesthes Africana (I was breeding them some time ago)If you have any question, put it in comment, I will answer next time. Also, next time- I'll show you more of my animals.


This is actually helpful to my girlfriend she has a pretty crappy flash so this will help her a lot. Thanks.
ReplyDeleteThanks, that was very useful. Definitely gonna try that for my camera.
ReplyDeletethat was pretty useful :)
ReplyDeleteGood post. This will help my girlfriend, too.
ReplyDeletePretty good. I'm shit at taking photographs anyways, but this is helpful.
ReplyDeleteThanks for the guide bro! It is much appreciated!
ReplyDeleteAmazing guide man!
ReplyDeleteWow big difference betweeen the two shots. Thanks for this nice little info
ReplyDeletethats smart. But now u have 2 bring this with you aswell
ReplyDeleteHmm, this is pretty mcguyger sweet, thanks for the infos!
ReplyDeletecool defiantly gonna try this
ReplyDeleteGreat tutorial, I've been waaay too cheap to buy myself one
ReplyDeleteBefore / After is a really nice difference. Looks like it sticks out a bit much, surprised it doesn't interfere with your frame at a wide angle. Nice DIY! I just finished one up too.
ReplyDeletewow, nice guide, i love this kind of stuff, thanks for posting
ReplyDeleteWow, such a huge improvement. I'll have to try this out. Thanks.
ReplyDeleteI could use something like that.
ReplyDeleteIt took me a while to craft it, but wow what a difference! Thanks man!
ReplyDeletei could make good use of this. thanks much for this its good info
ReplyDeleteAwesome, this is something I should do
ReplyDeleteThat's a neat trick. Following.
ReplyDeletewellthisdoesntsuck.blogspot.com
ow man, this is nice!
ReplyDeletenice guide, very useful!
ReplyDeletewow the difference is amazing. and you only used a bit of paper? great
ReplyDeletewooow awesome :D
ReplyDeleteawesome post, thanks for teaching this.
ReplyDeleteWow those seem really useful. It really improved the quality.
ReplyDeletecool, gonna use this!
ReplyDeletexx
Useful trick, thanks for the tip.
ReplyDeleteNice, I tried messing around with home made diffusers but this one looks really neat!
ReplyDeleteand portable!
I should try this!
ReplyDeletethats a really cool little homemade invention
ReplyDeleteMan, I need to try this pronto. The end result is obviously better.
ReplyDeleteoooo, Q, nice :p
ReplyDeleteHandy, thanks bro!
ReplyDelete